
How to Change the Resolution in Photoshop
There are several reasons why you would want to modify the resolution of the picture. Maybe you would like to make a large print of an image. Or to share on social media, you may want to downsize a pic. Either way, Adobe Photoshop makes it simple to change an image’s resolution.
In this post, in five simple steps, we will teach you how to adjust the resolution of your image.
What Is Image Resolution?
Resolution is the number of pixels in measurements of height and width. Based on the sensor size and pixel density, your camera can generate images of a certain scale.
A camera says, for example, that the resolution of the image is 8256 x 6192 (W x H) pixels. This means that the overall size of the pixel is 8256 x 6192 = 51,121,152. Divide one million by that figure. The outcome is the sum of megapixels that the sensor has. That’s 51MP in this situation.
You cut out pixels if you crop an image, so an image would have a lower resolution than can be generated by your camera. It explains the resolution as well. High resolution means more pixels in an image. This is because information about pixels is more dense.
High resolution offers greater clarity and improved picture quality for you. This suggests that you can print bigger ones. Smooth, continuous tones and colour transformations would be the result. But it normally contributes to a bigger file size.
The image resolution is measured in the form of DPI (dots per inch) or PPI (pixels per inch). The more dots (or pixels) per inch you have, the higher your image resolution would be.
How to Select the Right Size
Let’s talk briefly about how big or small you would like your pictures to be. A low-resolution image, one with a few pixels, can be taken and the resolution can be increased. But the limit will be there.
If you try to enlarge the image too much, it gets pixelated. This simply means that you can begin seeing the individual dots that make up the image. Everything depends on the amount of information in the picture and the purpose of it. It takes some practice and trial and error to know how far you can go.
How to Change Image Resolution in Photoshop
Image resolution in Adobe Photoshop can be easily increased or decreased. Through the steps, let us take you.
Step 1: Finding the Image Size
First, find your image size by opening the dialog box for the image size.
Go to Image > Image Size or use the shortcut Opt + Cmd + I (Alt + I for Windows).
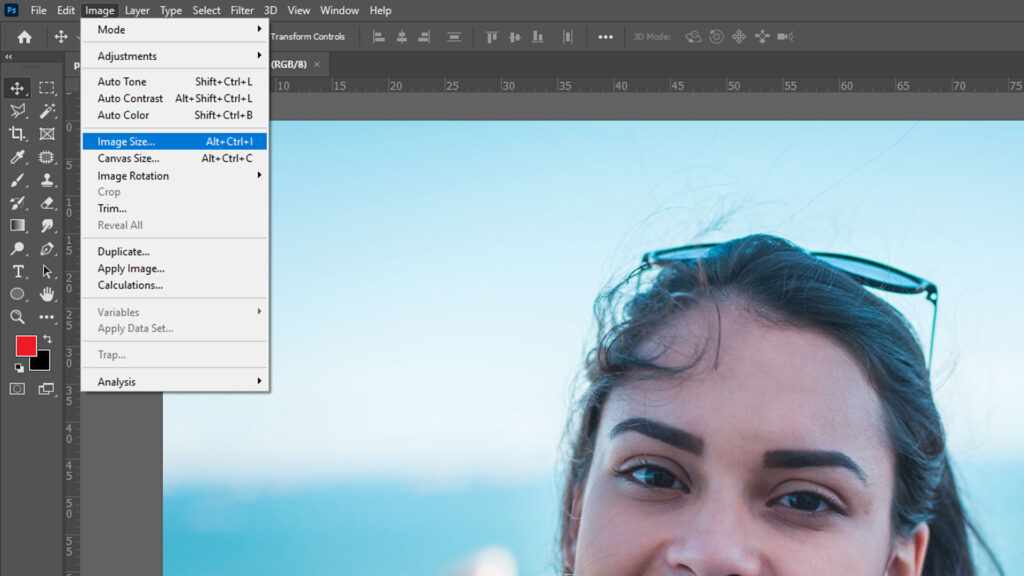
You’ll find your image size in this dialog box. You’ll see pixel proportions for width and height. By default, Adobe Photoshop will give you the pixel dimension, but you can adjust it to inches, centimeters, or even a percentage. It’ll be 100 percent your original pic. At the end, you can see your image’s file size.
We’re going to be using the tools in this window to adjust the image resolution.
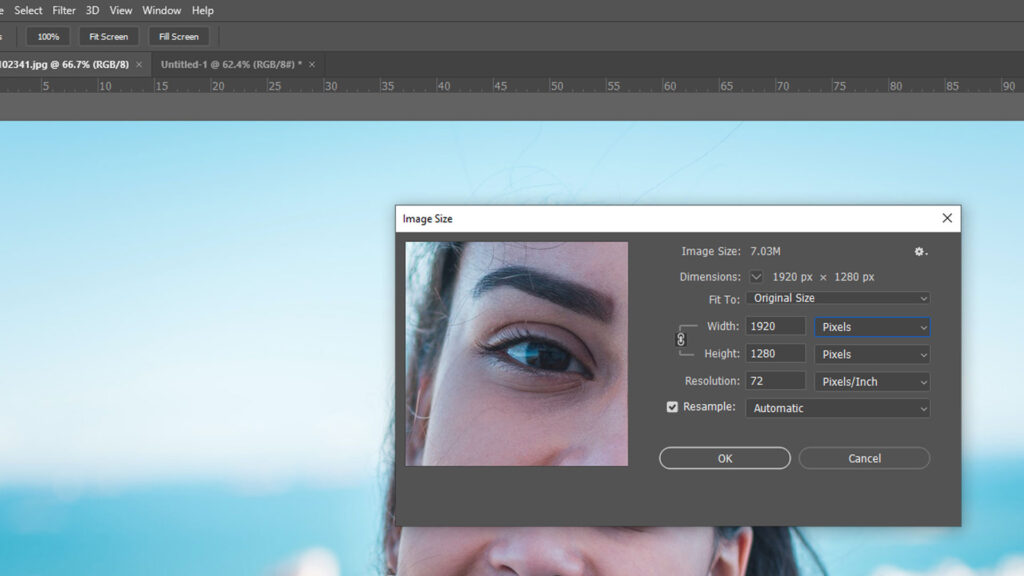
Step 2: Changing the Image Size
To adjust the resolution of your image, there are a few choices. You should choose one of the presets based on normal paper and print sizes if you’re printing.
Click the ‘Fit To‘ drop-down menu to pick a document size.
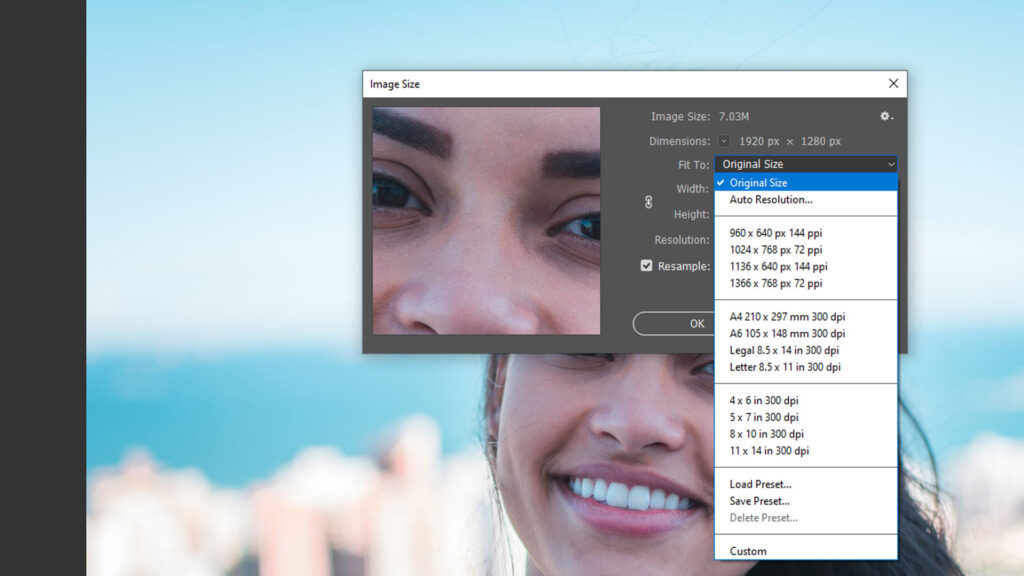
If you’re sharing the image online, you don’t need to stick to regular print sizes. Typically, setting the scale yourself is easier. Only type in the desired dimension over the actual size.
Photoshop will reduce the aspect ratio by nature. Photoshop would automatically adjust the height and keep the picture looking the same if you input a number to change the width.
Click on the icon that looks like a chain connecting the two dimensions if you want to change the width and height of the pixel dimensions individually. This instructs Photoshop not to limit the aspect ratio.
In the ‘Height’ or ‘Width’ box, type the amount of pixels you want.
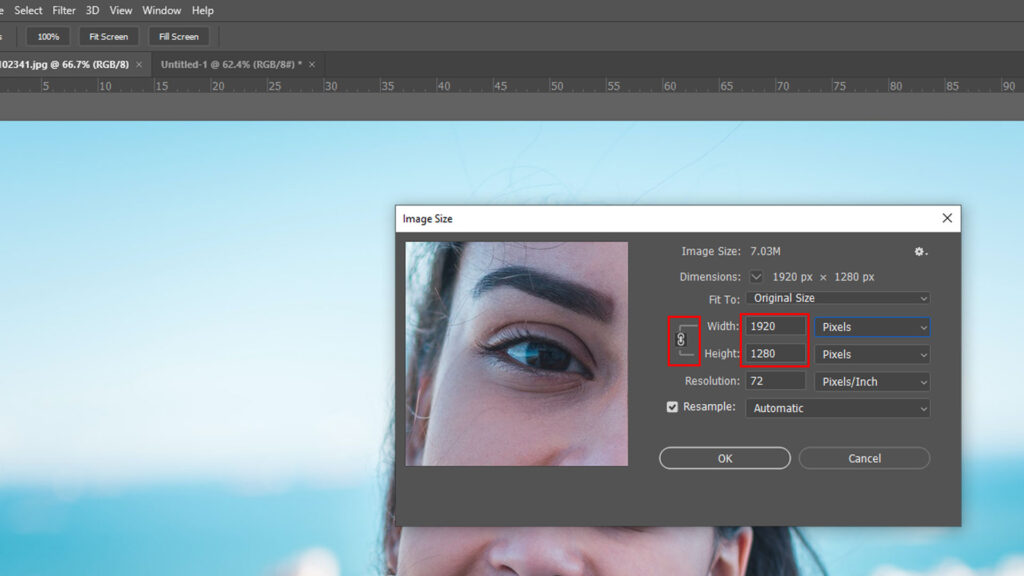
Note that the number at the top of the dialog box displaying the file size can change as you change your picture size. This is the image’s file size in MB.
Step 3: Resolution
The resolution box for the image sets the amount of pixels per inch. Everybody says this number has to be 300 pixels per inch to print the pic, but that’s not exactly true. The quality used for printing pictures is 300 DPI. But only at the resolution of the computer screen can online images be viewed. The screens are mostly 72 DPI.
This number you should keep as it is. Online photos won’t matter if they are 300 or 72 DPI.
Changing the DPI would modify the size of an image. Your image would be half the size if your image is 300 and you just change the DPI area to 150. Your file size will change as well.
Step 4: Selecting a Resampling Mode
The resampling mode decides which Photoshop algorithm will be used for inserting new pixels. To raise the resolution, there are two good options: ‘Preserve Details‘ and ‘Bicubic Smoother‘. To see the difference, you should try both.
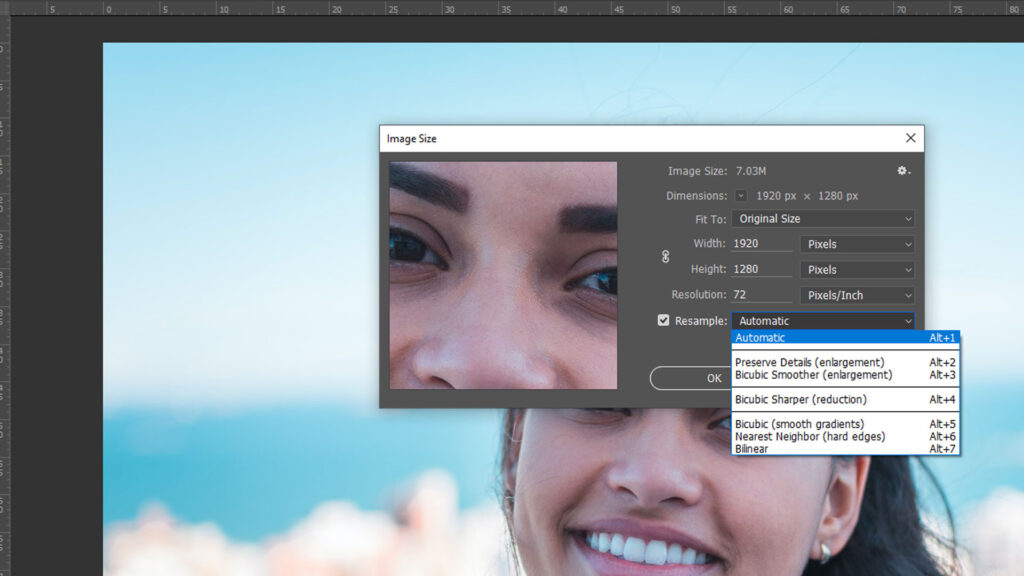
Click the ‘Resample’ box and choose the resample mode that fits for you.
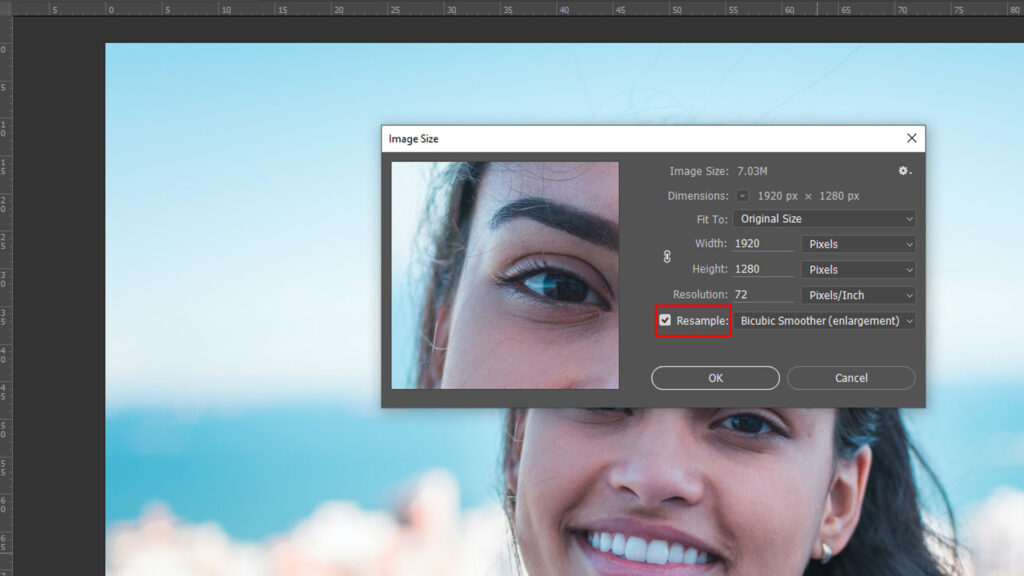
Step 5: Sharpening the Image
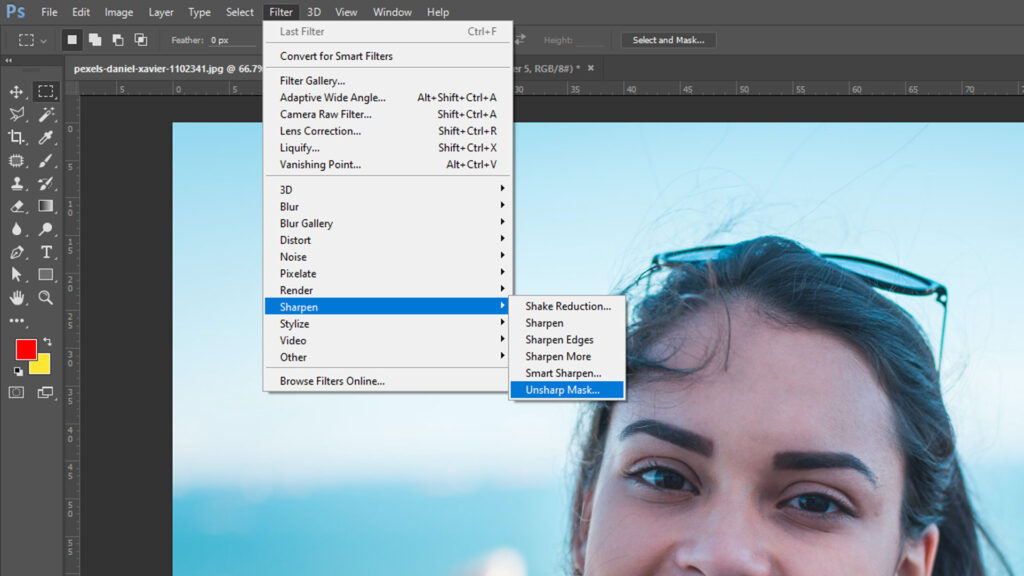
Sharpening after you increase picture quality or for web streaming is still a smart thing.
Go to Filter > Sharpen and select ‘Unsharp Mask’.
Drag the Amount slider to 100% and the radius to 1.0 When enlarging a picture, that’s a good setting to start with.
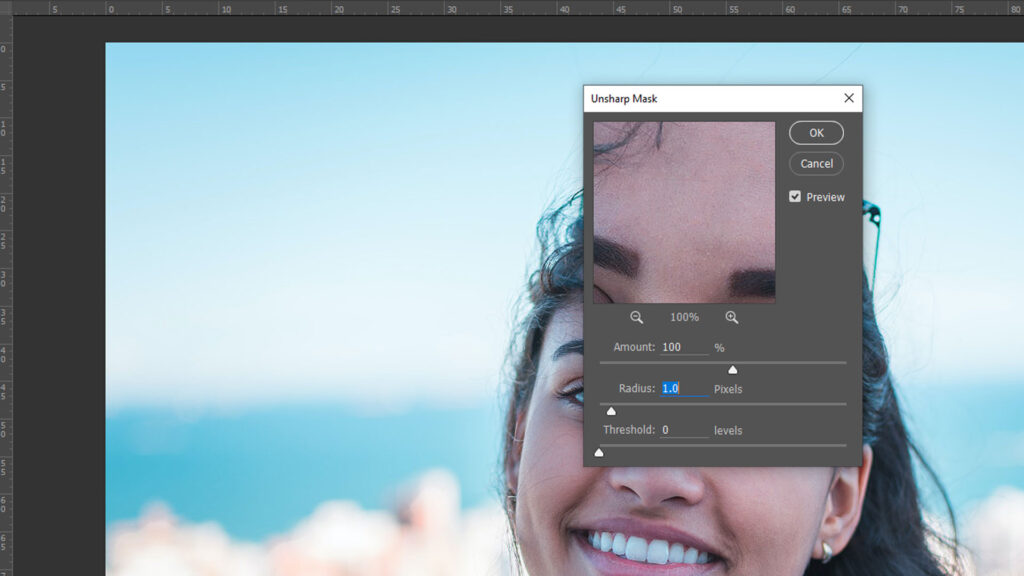
If the result doesn’t look right, you can apply more or less sharpening.
Finalization
Change the resolution, Such as Increasing or decreasing image resolution is simple with Adobe Photoshop. It does have some limitations, however.
Your starting image’s quality and scale will determine whether you’re going to get decent results. A image with pixel dimensions of 100 x 100 at 72 pixels per inch, for example, can not be resized at 300 pixels per inch to 3000 x 3000 and looks fine. This is absolutely too much to ask.
It also depends on the image’s intention. If you need a gallery print with high picture quality or a flag to hang against the wall? There’s no need for a super high resolution picture for a banner to look fine. Ask the printing studio what minimum resolution it needs at all times.
Share this post with your friends and express your views in the comments below.


